
Instructor Manual
Setting up your section
If no section is created for the course, click the Add new section button or new section link to create a section for the course.

Figure 2.1: Instructor Tools Page with Add new section Button
The New section modal box will open.

Figure 2.2: Instructor Tools Page with New Section Modal Box
Provide the Section Name, Section Tag, Start Date, and End Date and click the Save and manage section button. You can also clone any previously created section using section list, section key, and master section. To do so, the Create a New Section drop-down, and select the required option.

Figure 2.3: New Section Modal Box with Create a New Section Drop-down Options
After creating a new section, you can edit/customize the Section Tag, Class Name, and Description.

Figure 2.4: Setup Page with Section Tag, Class Name, and Description
Figure 2.1: Instructor Tools Page with Add new section Button
The New section modal box will open.
Figure 2.2: Instructor Tools Page with New Section Modal Box
Provide the Section Name, Section Tag, Start Date, and End Date and click the Save and manage section button. You can also clone any previously created section using section list, section key, and master section. To do so, the Create a New Section drop-down, and select the required option.
Figure 2.3: New Section Modal Box with Create a New Section Drop-down Options
After creating a new section, you can edit/customize the Section Tag, Class Name, and Description.
Figure 2.4: Setup Page with Section Tag, Class Name, and Description
Set section Start Date (continuous enrollment)
You can set section start date under the Starts heading. The On the day of enrollment setting is used for continuous enrollment situations such as self-paced students in a continuing education program, this will allow your student to use the section (or class) from the date of enrollment.

Figure 2.5: Setup Page with Starts Heading Option
Choosing the Fixed Start option will allow you to set your section start date with the help of a calendar.
Figure 2.5: Setup Page with Starts Heading Option
Choosing the Fixed Start option will allow you to set your section start date with the help of a calendar.
Set section Mastery Level
Determine how you will define the Mastery Level of the course in terms of percentage. To set this percentage, simply type the desired percentage or click up or down arrow button to increase or decrease mastery percentage.

Figure 2.6: Setup Page with Course Mastery Level
Figure 2.6: Setup Page with Course Mastery Level
Set a Welcome Message
You can set a welcome message for your students enrolled in a section, the message would be visible to students on their section’s dashboard. To set a welcome message, click the Welcome Message tab. Enter the desired message in the box and click the Save button.

Figure 2.7: Welcome Message Tab with Save Button
Figure 2.7: Welcome Message Tab with Save Button
Set Announcement
You can set announcements for your students enrolled in the section, the announcements would be visible to students on their section’s dashboard. To set announcements, click the Announcement tab and click the expand button next to the End Date heading. Enter the desired message/text, which you want to announce, under the Announcement heading. You can set start and end date for your announcement under the Start date & End date heading. Use the calendar to set desired dates.
_0002G5.gif)
Figure 2.8: Add Announcement Button with Announcement Message Box
To delete any announcement, click the delete button parallel to the announcement.
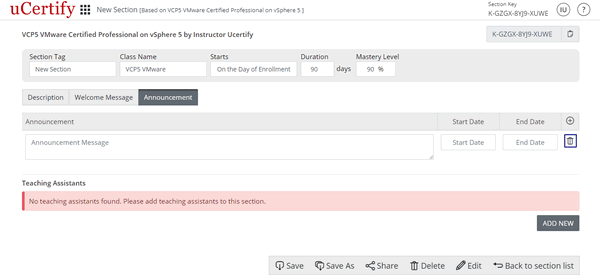
Figure 2.9: Setup Page with Delete Announcement Button
Figure 2.8: Add Announcement Button with Announcement Message Box
To delete any announcement, click the delete button parallel to the announcement.
Figure 2.9: Setup Page with Delete Announcement Button
Add a Teaching Assistant
Just below the section description, there is an area where you can add the Teacher or Teaching Assistants to the new section. Click the Add New button, and provide your Teacher or Teaching Assistant’s email from the Role drop-down (if your Teacher or Teaching Assistant has signed-up on uCertify, his/her first and last name will be fetched automatically) and click the Save button. The Teaching Assistant has the ability to only view class information, roster, readiness score, focus, engagement report, activities, and test performance.
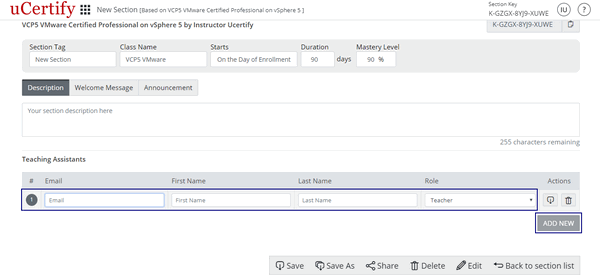
Figure 2.10: Add New Button with Teaching Assistant Details Boxes
Figure 2.10: Add New Button with Teaching Assistant Details Boxes