Premium Features

Previous Buy now to get complete version Next

Buy now to get complete version

You are using the free version of the product. You get:

  1. Free pre assessment.
  2. Free first chapter.
Buy now to get complete version

  • Home
  • Instructor Manual

uCertify Logo
  • login
  • Signup
    • Help & Support
    • Accessibility
    • Testimonials
  • Powered by uCertify
  • Request Demo
  • Hello GuestLogin or Signup
  • Feedback & Support
    • Support
    • Keyboard Shortcuts
    • Send Feedback
Scroll to top button
  • About
  • Getting Started
  • Side Panel
  • Where to locate instructor tools
  • How to exit instructor tools
  • Providing students with the section key
  • Setting up your section
  • Set section Start Date (continuous enrollment)
  • Set section Mastery Level
  • Set a Welcome Message
  • Set Announcement
  • Add a Teaching Assistant
  • Invite or Enroll Students
  • Invite Students
  • Enroll Students
  • Using Track to Manage your Course/Sections
  • Demo Data
  • Roster
  • Set Tag
  • Set Section
  • Change Password
  • Remove Student
  • Send Message
  • Study Planner
  • How to Filter Students
    • FILTER BY TAG
    • FILTER BY EMAIL
    • ADVANCE FILTER
  • Export
    • TRACK REPORT
    • ATTENDANCE
  • Actions
  • Lessons
  • Labs
  • Practice
  • Prepengine Tab
  • Assessments
  • Gradebook Tab
  • More
    • ACTIVITIES
    • ANALYTICS
    • CLASS RANKING REPORT
    • STUDY PLAN
  • Assignments
  • Setting up assessments
  • Auto selection of items
  • Schedule assessments
  • Unschedule assessments
  • Assign assessments
  • Modify assessments
  • Preview assessment
  • Archive assessment
  • Delete assessment
  • Search Assessment and Filter Assessment Tabs
  • Reordering assessments
  • Sharing assessments
  • Importing assessments
  • Design Course/Section
  • Pre-Assessment
  • LTI help and its use
  • Lessons
  • Settings of cards, quizzes, and exercises
    • CARDS
    • QUIZ
    • EXERCISE
    • PRACTICE TESTS
    • ASSESSMENTS
  • Grade Scale
  • Gradebook Settings
  • Sequence
  • Resources
  • Student View
  • Administrative Functions
  • How to create and clone a master section
  • Student
FAQs Videos Manual

Instructor Manual

Pre-Assessment

The pre-assessment settings menu allows you to manage test settings by selecting the criteria accordingly. Click the settings menu. You can add title, description, and items to the pre-assessment. To do so, click the pencil icon in the Test set : Pre Assessment modal box and provide the required details.

The figure is showing the Test set : Pre Assessment modal box with pencil icon and Title, Description, and Items box.

Figure 6.1: Test set : Pre Assessment Modal Box with Pencil Icon and Title, Description, and Items box

You will get the following tabs:
  • Schedule Test
  • Test Setup
  • Levelling

Schedule Test

Schedule Test tab allows you to set Start Date, End Date, Time Zone, Prerequisite, and Password of test.

The figure is showing the Schedule Test tab of the Pre-Assessment settings.

Figure 6.2: Schedule Test Tab of Pre-Assessment Settings
Test Setup

Test Setup tab allows you to set test duration, tries allowed and perform the following actions:

  • Randomize Items: It allows you to randomize items in the Pre-Assessment.
  • Randomize options: It allows you to randomize options of the questions.
  • Pausing allowed: It allows the student to pause the Pre-Assessment in between.
  • Set last option as “None of the above”: It allows student to select “None of the Above” option in the Pre-Assessment.

The figure is showing the Test Setup tab of the Pre-Assessment settings.

Figure 6.3: Test Setup Tab of Pre-Assessment Settings

Levelling


Levelling tab allows you to manage the visibility of the Lessons and Post Assessments on the basis of readiness score.

The Pre-Assessment settings modal box with the Levelling tab.

Figure 6.4: Pre-Assessment Settings Modal Box with Levelling Tab

To do the required settings in Score (%), Lesson, or Post Assessment, click the Enable button at the bottom.

The figure is showing the Pre-Assessment Levelling modal box with the Delete and OK button.

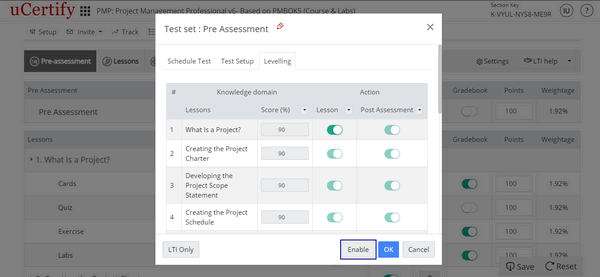
Figure 6.5: Pre-Assessment Levelling Modal Box with Enable Button

>Score (%) option allows you to set the readiness percentage for the desired lesson. Student will be able to access the lesson or questions of a lesson in the Post Assessment, after he/she has completed the given percentage in the Lesson.

To set the readiness percentage for every lesson, click drop-down next to the >Score (%) option. Enter the desired readiness percentage and click the OK button.

The figure is showing the Pre-Assessment Levelling modal box with >Score(%) drop-down.

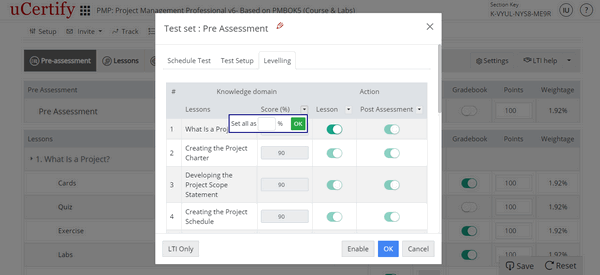
Figure 6.6: Pre-Assessment Levelling Modal Box with >Score(%) Drop-down

To turn Off or On the visibility of entire accessibility of every lesson or questions of a lesson in the Post Assessment, click the Lesson or Post Assessment drop-down, and select the desired option.

The figure is showing the Pre-Assessment Levelling modal box with the Lesson drop-down.

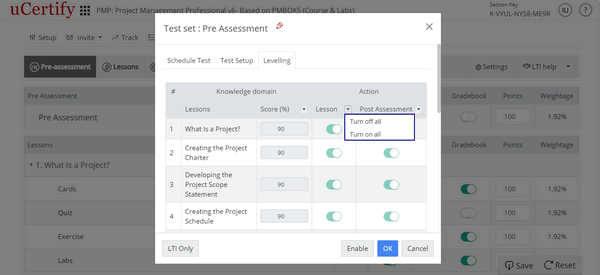
Figure 6.7: Pre-Assessment Levelling Modal Box with Lesson Drop-down

To turn Off or On the visibility of entire accessibility of every lesson or questions of a lesson in the Post Assessment, click the Lesson or Post Assessment drop-down and select the desired option.

The figure is showing the Pre-Assessment Levelling modal box with the Post Assessment drop-down.

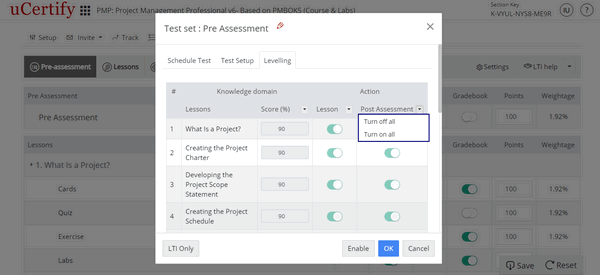
Figure 6.8: Pre-Assessment Levelling Modal Box with Post Assessment Drop-down
After the required customization, click the OK button to freeze your preferences or click the Disable button to remove the changes made using levelling option from the course or section.

The figure is showing the Pre-Assessment Levelling modal box with the Disable and OK button.

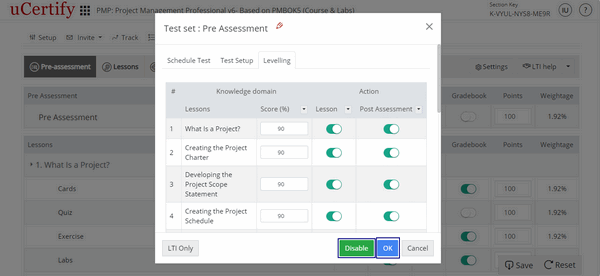
Figure 6.9: Pre-Assessment Levelling Modal Box with Disable and OK Button

  • Items represents the number of items in the particular grade item.
  • To hide desired grade items or chapters, under the Visibility option, click the On or Off button.
  • To edit settings of the grade items or chapters, click the settings menu next to the desired grade item or chapter.
  • The Points option represent the summative evaluation of a student’s performance across a grade item tracked in the Gradebook. Enter the Points parallel to the grade item.
  • The Weightage option is based on the Points assigned in the Gradebook.
  • To include or exclude grades of a particular item in the gradebook and sync, click the On or Off button, under the Report option, parallel to the grade item.
  • To include or exclude grades of a particular item from the final grade calculation, click the On or Off button, under the Graded option, parallel to the grade item.

The figure is showing the Design tab with the options to manage the Grade Items.

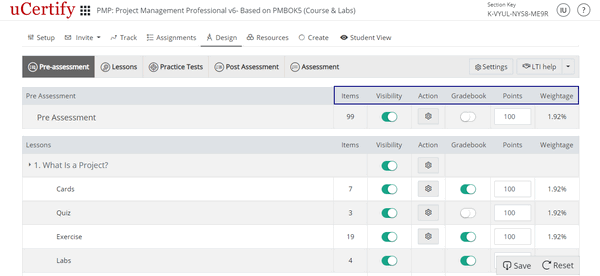
Figure 6.10: Design Tab with Options to Manage the Grade Items

Note


You can include or exclude grades of a particular item, after you have turned on the Report option for a grade item.
×
We use cookies to enhance your experience. By continuing to visit this site you agree to our use of cookies. More information
Accept