Premium Features

Previous Buy now to get complete version Next

Buy now to get complete version

You are using the free version of the product. You get:

  1. Free pre assessment.
  2. Free first chapter.
Buy now to get complete version

  • Home
  • Instructor Manual

uCertify Logo
  • login
  • Signup
    • Help & Support
    • Accessibility
    • Testimonials
  • Powered by uCertify
  • Request Demo
  • Hello GuestLogin or Signup
  • Feedback & Support
    • Support
    • Keyboard Shortcuts
    • Send Feedback
Scroll to top button
  • About
  • Getting Started
  • Side Panel
  • Where to locate instructor tools
  • How to exit instructor tools
  • Providing students with the section key
  • Setting up your section
  • Set section Start Date (continuous enrollment)
  • Set section Mastery Level
  • Set a Welcome Message
  • Set Announcement
  • Add a Teaching Assistant
  • Invite or Enroll Students
  • Invite Students
  • Enroll Students
  • Using Track to Manage your Course/Sections
  • Demo Data
  • Roster
  • Set Tag
  • Set Section
  • Change Password
  • Remove Student
  • Send Message
  • Study Planner
  • How to Filter Students
    • FILTER BY TAG
    • FILTER BY EMAIL
    • ADVANCE FILTER
  • Export
    • TRACK REPORT
    • ATTENDANCE
  • Actions
  • Lessons
  • Labs
  • Practice
  • Prepengine Tab
  • Assessments
  • Gradebook Tab
  • More
    • ACTIVITIES
    • ANALYTICS
    • CLASS RANKING REPORT
    • STUDY PLAN
  • Assignments
  • Setting up assessments
  • Auto selection of items
  • Schedule assessments
  • Unschedule assessments
  • Assign assessments
  • Modify assessments
  • Preview assessment
  • Archive assessment
  • Delete assessment
  • Search Assessment and Filter Assessment Tabs
  • Reordering assessments
  • Sharing assessments
  • Importing assessments
  • Design Course/Section
  • Pre-Assessment
  • LTI help and its use
  • Lessons
  • Settings of cards, quizzes, and exercises
    • CARDS
    • QUIZ
    • EXERCISE
    • PRACTICE TESTS
    • ASSESSMENTS
  • Grade Scale
  • Gradebook Settings
  • Sequence
  • Resources
  • Student View
  • Administrative Functions
  • How to create and clone a master section
  • Student
FAQs Videos Manual

Instructor Manual

Using Track to Manage your Course/Sections

On the Track tab, you have following tabs that control student data - Roster, Lessons, Labs, Practice, Prepengine, Assessments, Gradebook, and More.

Note
The Labs tab will appear if the course/section has labs.

The figure is showing the Track Page.

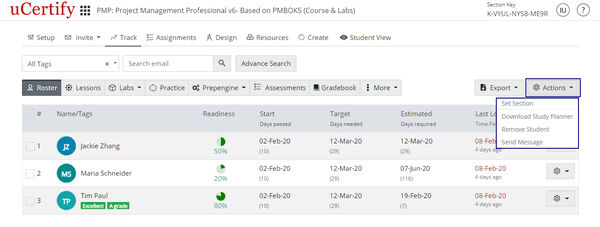
Figure 4.1: Track Page

Demo Data

uCertify provides a comprehensive set of instructor tools to manage each course and section efficiently and effortlessly. To understand the functionality of each instructor tools, it is necessary to have students enrolled in a course or section. Demo data allows you to query the instructor tools without having on-board real students enrolled or authenticate real data sources. uCertify provides demo data of students to analyze the functionality of instructor tools.

The figure is showing the student demo data.

Figure 4.2: Student Demo Data

Note
If there are students enrolled in a course or section, the demo data will not appear.

To view the demo data of students click the close button at the top right corner of the box. You will be able to see demo data of students with sample watermark on it & a pink box will appear on the bottom of the table. If you want to hide the sample watermark from the demo data, click the close button of the pink box.

The figure is showing sample watermark from demo data.

Figure 4.3: Sample Watermark From Demo Data

Roster

The primary roster view provides you at-a-glance view on your students’ data such as their Name/Tags, Readiness, Start Days passed, Target Days needed, Estimated Days required, and Last Login date.

The figure is showing Roster tab.

Figure 4.4: Roster Tab
Note
Numbers below dates under Start Days passed, Target Days needed, and Estimated Days required headings denote the number of days passed after starting the course, target days needed to complete the course, and estimated days required to complete the course.

Set Tag

Use the Roster tab to view your students within a course or section. Locate the student you wish to tag, click the settings menu in the last column of the table, and select the Set Tag option for that student.

The figure is showing the Track tab with the Set Tag option.

Figure 4.5: Track Tab with Set Tag Option

To remove a previously added set tag, click the close symbol. To add a new tag, type your tag in the Tag box. It will look for a suitable match based on your search, which will enable your tags to be consistent across multiple students.

The figure is showing the Set Student Tag modal box.

Figure 4.6: Set Student Tag Modal Box

If no match is found, click enter and then click the Save button.

The figure is showing the Set Student Tag modal box with the Save button.

Figure 4.7: Set Student Tag Modal Box with Save Button

Set Section

On the Track tab, select the Roster tab. Click the settings menu in the last column of the table and select the Set Section option. The Set Student Section modal box will open.

The figure is showing the Track tab with the Set Section option.

Figure 4.8: Track Tab with Set Section Option

Select another section to move student from one section to another. Click the close button to remove student from that particular section. Click the Save button after selecting or removing course.

The figure is showing the Set Student Section modal box with the Save button.

Figure 4.9: Set Student Section Modal Box with Save Button

Change Password

You can change your student’s password or send the reset password link. To do so, click the settings menu in the last column of the table and select the Change Password option.

The figure is showing the Track tab with the Change Password option.

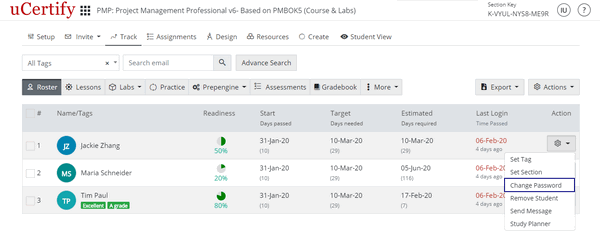
Figure 4.10: Track Tab with Change Password Option

Provide the required details and click the Save button.

The figure is showing the Change Password Modal Box with the Change Password Tab.

Figure 4.11: Change Password Modal Box with Change Password Tab

To send the reset password link to your student, click the Send Reset Password Link tab and click the blue button.

The figure is showing the Change Password modal box with the Send Reset Password Link tab.

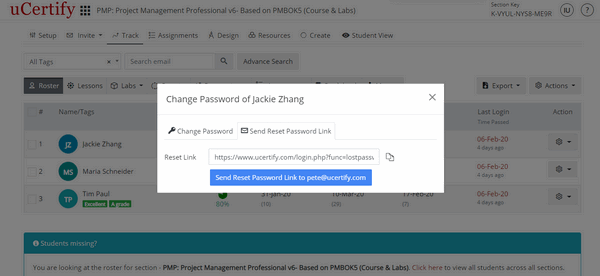
Figure 4.12: Change Password Modal Box with Send Reset Password Link Tab

Remove Student

You can remove student from your section. Click the settings menu in the last column of the table and select the Remove Student option. Click the OK button to confirm.

The figure is showing Track tab with the Remove Student option.

Figure 4.13: Track Tab with Remove Student Option

The figure is showing the Track Tab with the Confirmation modal box.

Figure 4.14: Track Tab with Confirmation Modal Box

Send Message

If you are on the Roster tab and would like to send message to a student, click the settings menu in the last column of the table, and select the Send Message option.

The figure is showing the Track tab with the Send Message option.

Figure 4.15: Track Tab with Send Message Option

Complete the email and click the Send button.

The figure is showing the Send Message modal box.

Figure 4.16: Send Message Modal Box

Study Planner

You can monitor individual student performance by study planner. Click the settings menu in the last column of the table and select the Study Planner option.

The figure is showing the Track tab with the Study Planner Option.

Figure 4.17: Track Tab with Study Planner Option

How to Filter Students

You can search for student via three methods:

  • Filter by Tag
  • Filter by Email
  • Advance Filter
FILTER BY TAG
Select a tag from the All Tags drop-down and click the Get button to show students.

The figure is showing the Track tab with All Tags drop-down.

Figure 4.18: Track Tab with All Tags Drop-down
FILTER BY EMAIL
Enter student’s email in the search box and click the search icon.

The figure is showing the Track Tab with the Search email box and search icon

Figure 4.19: Track Tab with Search email Box and Search Icon
ADVANCE FILTER
Click the Advance Search button.

The figure is showing the Track tab with the Advance Search button.

Figure 4.20: Track Tab with Advance Search Button
Define your criteria sort order and click the Search button.

The figure is showing the Advance Search modal box with the Search button.

Figure 4.21: Advance Search Modal Box with Search Button

Export

You can export gradebook and attendance of your students across the section.
TRACK REPORT
To download track report of your students across the section, click the Export menu, and select the Track Report option.

The figure is showing the Track Tab with the Export button options.

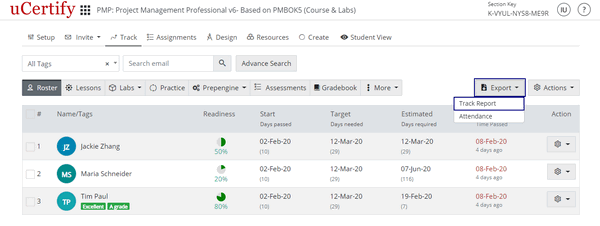
Figure 4.23: Track Tab with Export Button Option
Select the desired options which you want to export, downloaded file format option, download settings, and click the Download button. Your track report data will be downloaded along with the average test score.

The figure is showing the Export Track Report modal box with the Download button.

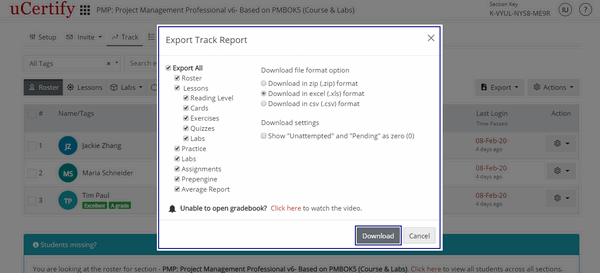
Figure 4.24: Export Track Report Modal Box with Download Button
ATTENDANCE
To download attendance of your students across the section, click the Export menu, and select the Attendance option.

The figure is showing the Track tab with the Export button option.

Figure 4.25: Track Tab with Export Button Option
Set the Start and End Date and click the Download button.

The figure is showing the Export Attendance modal box with the Download button.

Figure 4.26: Export Attendance Modal Box with Download Button
Note
Sample student data is loaded for demonstrating functionality. Unless you have students in your section and they have begun completing assessments, no data will appear.

Actions

You can set section of student, send message to student, remove student, or download study planner of student. To do so, check the checkbox before the name or email id of desired students, click the Actions button and select the desired option.

The figure is showing Roster page with Actions button and its options.

Figure 4.27: Roster Page with Actions Button and its Options

Lessons

The Lessons tab shows the reading percentage of chapters and readiness or preparedness percentage attained by the students in the cards, exercises, quizzes, and labs of each lesson.

The figure is showing the Lessons tab.

Figure 4.28: Lessons Tab

Labs

The Labs tab shows the information about the activity of the students in lab. This tab can be viewed in two views: Table View and Student View.

The figure is showing the Track tab with the Labs tab options.

Figure 4.29: Track Tab with Labs Tab Options

Practice

The Practice tab shows readiness or preparedness percentage attained by the students in the lab, pre-assessment, post-assessment, and test-prep.

The figure is showing the Practice tab.

Figure 4.30: Practice Tab

You can also change the points of your students. To do so, click on any grade point. A modal box will open showing the test history. Click on the settings menu and then select the Review option.

The figure is showing the grade point modal box of student.

Figure 4.31: Grade Point Modal Box of Student

The figure is showing the Grade Point Modal Box with the Review Option.

Figure 4.32: Grade Point Modal Box with Review Option

You can delete your students test. To do so, select the Delete test option from the settings menu. Click the Yes button to delete the test.

The figure is showing the Grade Point Modal Box with the Delete Option.

Figure 4.33: Grade Point Modal Box with Delete Option

Prepengine Tab

This will show readiness or preparedness percentage attained by the students in Prepengine. This tab can be viewed in two views: Table view and Student view.

The figure is showing the Track tab with the Prepengine tab options.

Figure 4.34: Track Tab with Prepengine Tab Options

Assessments

If you have created assessments for your section, you will see an additional tab that is Assessments. This will show readiness or preparedness percentage attained by the students in the items of assessments created by you.

The figure is showing the Assessments tab.

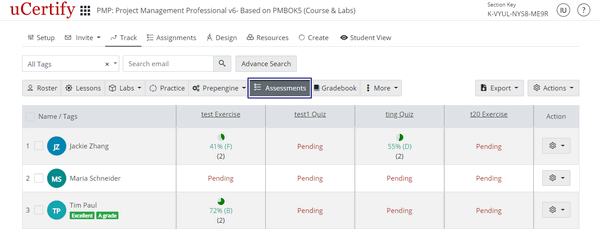
Figure 4.35: Assessments Tab
You can also take the re-test or give new assessment to your students. To do so, click the test history percentage of the student. The test history modal box will open. Click the Re-test or the New assessment tab as per the requirement, provide the test start date, due date, time allowed, and click the Retest button.

The figure is showing the Test History modal box with the Retest button.

Figure 4.36: Test History Modal Box with Retest Button

Gradebook Tab

You can define the parameters for assessing your student’s performance by setting up a gradebook. Go to the Gradebook tab and click the Define Gradebook button. This will allow you to define the grades for cards, quiz, exercise, labs, test sets, or assessments.

The figure is showing the Gradebook tab with the Define Gradebook button.

Figure 4.37: Gradebook Tab with Define Gradebook Button

You can export the gradebook of your students. To do so, click on the Export button and select the Gradebook option.

The figure is showing the Gradebook tab with the Export button options.

Figure 4.38: Gradebook Tab with Export Button Options

Select the file format option in which you want to download the gradebook and select the Percentage or Points option. Click the Download button. The gradebook will be downloaded with the settings provided by you.

The figure is showing the Export Gradebook Modal box.

Figure 4.39: Export Gradebook Modal Box

More

You can view activities, analytics, class ranking report, study plan of your students across the section.
ACTIVITIES
To view the performance of your students in different test preps, assessments created by you, pre and post assessments; click the More tab and select the Activities option. You can search a particular test activity by using the search box, you can sort the results further using the Test Mode and Test Type.

The figure is showing the Track tab with the More tab options.

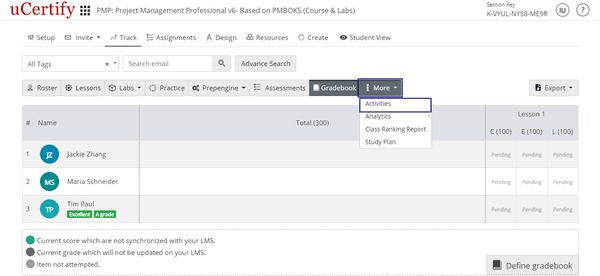
Figure 4.40: More Tab with Activities Option
You can view or delete the test of your student. To do so, click on the settings menu in the last column of the table and select the desired option.

The figure is showing the Activities page with the option to view or delete test.

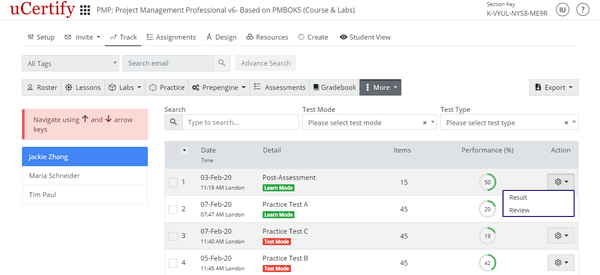
Figure 4.41: Activities Page with Option to View or Delete Test
ANALYTICS
To view or export the competency, class performance, or test analytics of student; click the More tab, click Analytics, and select the desired option.

The figure is showing the track page with the Analytics options.

Figure 4.42: More Tab with Analytics Options

In Test Analytics, you can filter and export the results on the basis of the following three Report types:

  • Best Score
  • Last Score
  • All Attempts

To do so, on the Test Analytics page, click the Report Type drop-down, and select the required filter criteria.

The figure is showing the Test Analytics Page with Report Type Options.

Figure 4.43: Test Analytics Page with Report Type Options
CLASS RANKING REPORT
To view the class ranking report of students, click the More tab and select Class Ranking Report option.

The figure is showing the More tab with the Class Ranking Report option.

Figure 4.44: More Tab with Class Ranking Report Option

To change the section, click the Section drop-down and select the desired option. To view reports on the basis of the test type, select the desired test type from the drop-down.

The figure is showing the Class Ranking Report page with Section and Test Type drop-downs.

Figure 4.45: Class Ranking Report Page with Section and Test Type Drop-downs
STUDY PLAN

To view the study planner of your students enrolled in your section/course, click the More tab, and select the Study Plan option.

The figure is showing the More Tab with the Study Plan Option.

Figure 4.46: More Tab with Study Plan Option
×
We use cookies to enhance your experience. By continuing to visit this site you agree to our use of cookies. More information
Accept